If you are looking for DIY gifts on a budget, this project is the answer for everyone on your list! And here’s why: endless options!
You can basically create any pattern on any object from tote bags to coasters to bandanas to tea towels. Plus, you can basically be any age to make these.
First gather your materials:
Craft foam
Cardboard
Fabric paint
Tote bags, gift bags, tea towels
Paint brushes
Glue
Fabric markers
Cut out a shape from craft foam that you want to appear on your material.
Cut a piece of cardboard that’s slightly bigger than your shape.
Glue your foam shape to the cardboard; let the glue dry before stamping. (Remember, your image is going to be a mirror of what you see, so if you are designing anything that relies on direction, like letters, make sure you glue it onto the cardboard backwards.)
Brush a thin layer of fabric paint onto the foam shape. It’s good to do a test print on scrap paper before going right to your item. Press the inked stamp onto your surface and remove.
Repeat step 4 until your pattern is complete. If you want to change colors, make sure you stamp off the excess paint before applying the second color.
Let dry completely.
Optional: You can add little details with fabric markers once the paint is completely dry.
A few commonly asked questions answered:
Wash, dry and iron? Yes! You can wash a fabric item in warm water; fabric softener keeps the paint flexible. It’s best to iron inside out or on the back of the fabric.
Acrylic paint or fabric paint? Acrylic paint will function similarly, but the reason we like the soft fabric paint is because it prevents the pattern from feeling rough and stiff. If you are stamping on a notebook or notecards, acrylic paint is just fine.
Benefits of printmaking as gift making? The reason we love this method for DIY gifts is 2-fold. First because you can create a custom pattern that appears professional and crisp. And secondly, if you are making lots of gifts, you can basically become a little print factory and mass produce your gift items!
Skill Level? You can create a dynamic pattern with a simple circle, square or triangle! You don’t have to be an expert artist to make something that is really beautiful and textured. Play with colors, layering and juxtaposing shapes to create something really unique.
Play with other household objects that can become stamps. Think pencil erasers, wine corks, forks, a cut potato, a leaf and more!
Thanksgiving is one of my favorite holidays to craft for—the rich colors, the dance between natural materials and traditional craft supplies, and the meaning behind it all give me the warm fuzzies. I love making crafts that combine all of these things, celebrating nature, gratitude, and family.
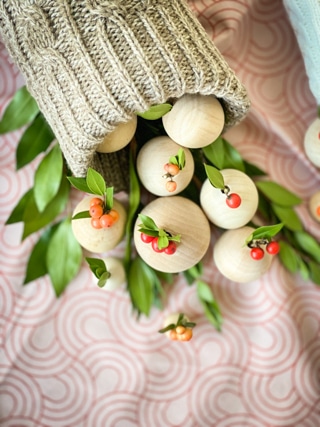
When Stonyfield asked me to create a Thanksgiving craft idea reusing their yogurt containers, I knew immediately that a cornucopia was in my future. Once I figured out how to achieve the shape, the outside material was the real challenge. Paper? Too sharp. Burlap? Too obvious. Felt? Too perfect. So I closed my eyes and tried to channel the autumn vibe of Thanksgiving. And that’s when it dawned on me…a nubby, cable-knit sock! You can take advantage of one of life’s greatest mysteries and use a single sock survivor from the laundry room, or shop for the ideal specimen, giving you two socks to make a lovely set. Use the quart-size container to make a centerpiece, and the single-serve cups to make minis that can sit at each place setting.
You can fill your cornucopias with small fruits, pumpkins, nuts, and leaves, or make your own with wooden beads, twigs, and berries. If you have young kids at home, you could also use their playfood to fill your horns of plenty!
For the kid that wants to make a statement on Halloween, this peacock costume is the one! Made with lightweight paper sheets and dowels, the feathers are attached to the belt, allowing the bird to take a break from their feathers during an active night of trick-or-treating.
Under the Sea: it’s a popular category for birthday parties, animated features, and also, you guessed it, Halloween costumes!
When I proposed a jellyfish costume to Parents for their October 2021 issue, they were all about it. The most vital item that you need for this magical animal costume is the hands-free umbrella! It will give your little sea creature the structure they need to exist as an out-of-water jellyfish, with their hands free to collect all the candy!
Below are the links for materials that I used…and for the full how-to, click over to Parents.com!
Sometimes you feel like a ghost, sometimes you don’t. And by feeling like a ghost, I mean decorating with them. Ghosts and witches, and spiders and eyeballs are what Halloween is made of, but sometimes a slightly more sophisticated approach is what you’re feeling.
I made these easy felt Halloween pennants for Oriental Trading’s Fun365 website…click on over there for the full how-to, shopping list, and template!
When my kids were younger, I would always start the Halloween costume suggestions with animals. First, who doesn’t love a cute little kiddo dressed up as a furry friend, a cute crawler, or an exotic species? There is so much DIY potential in these costumes from colors to textures to materials…what more could a crafty parent want??
When Parents magazine asked me to drum up some animal costumes this year for their October 2021 issue, I was all paws on deck. Starting with the smallest of the group…this elegant, stylish snail.
One great thing about this costume is that it’s worn like a backpack and is VERY lightweight, so it won’t aggravate even the most sensitive of kiddos. You can wear any under-clothes that you want from a frilly dress to leggings and a tee.
Check out the rest of the animals over at Parents.com!
The biggest summertime challenge of parenthood is how to balance out the summer fun while avoiding any brain drain. As we come off the weirdest school year in history, our kids’ focus on devices for learning, socializing, and playing have rocked the worlds of us parents…particularly ones like myself who pride themselves on the classics of unplugged fun: crafting, cooking, and especially reading.
As the summer progresses, our world is feeling like it’s getting a bit closer to normal, and let me tell you, a subscription to The Week Junior for your 8-to-14-year-old kids will most definitely help you with that. Issue 63 is a treasure…one to hold onto for its amazing feature: ‘Best Kids’ Books for Summer.’ It’s a thoroughly curated list of exciting new books, classic books, and books of all genres for kids ages 8-14. Click this link to find the book list and for a chance to win a free bundle of books!
Oliver and Sommer LOVE getting their weekly issue of The Week Junior in the mail…Sommer immediately flips to the fun stuff in the back and Oliver goes directly to the science section. (And, to be honest, I like to read the politics and world news because I love the simplified version!) Also, when there’s a topic that feels hard to explain on their level, it serves as a great reference point. And for the summer, the ‘Best Kids’ Books for Summer’ feature really helps narrow the massive world of books for tweens.
I was so excited when The Week Junior asked me to come up with some summer-inspired crafts for their summer marketing campaign! Check ‘em out below and use the templates and how-to instructions to make your own!
And, whatever you do, don’t forget to click here for your own subscription to The Week Junior!
POPPY PAPER POPSICLES
What you’ll need:
Colorful craft paper
Scissors
Tongue depressors
Glue or glue dots
Bugle beads (optional)
Make it:
Print and cut out the template for the popsicle and trace onto colorful craft paper.
Decide which design you want to make and cut the layers. Use the template to trace onto various colors of craft paper and cut them out from the full popsicle shape.
Glue each layer together. (Glue the bugle beads on as sprinkles: optional)
Glue a popsicle stick to the back.
Bonus idea: Tape a string to the backs of each popsicle and make a summery garland!
POSITIVE PENNANTS
What you’ll need:
Felt in various colors
Tacky glue
Scissors
¼” dowels
Straight pins
Make it:
Print out word templates and pin them to a piece of felt.
Cut out the letters.
Place the letters on another piece of felt and cut the pennant shape around them.
Glue the letters to the pennant.
Cut a ¾” strip of a third color of felt and glue along the straight left edge. Trim the top and bottom to match the angle of the pennant.
Cut four 2” strips and glue behind the straight, left edge.
Glue the dowel behind the pennant and allow everything to dry completely.
Trim your skewer to 8” tall. Poke skewer up through the bottom of the boat, through the middle point.
Print out the sail template and stack with craft paper. Cut out the templates and poke holes using the skewer on the top and bottom points of the sail.
Slip the sails over the skewer in this order: bottom of large sail, bottom of small sail, top of small sail, top of large sail.
WATER
Paint two pieces of paper blue. Let it dry.
Rip one piece of paper into strips, making waves as you rip.
Tape the strips over the solid blue paper.
Cut a wavy edge along the top of a manilla envelope to use as the beach.
You can also make small fish by following this origami tutorial.
I have a thing for outdated tech…a wall-mounted rotary phone with a cord? Give me them all. Film cameras with bellows? I can’t resist. Typewriters? Yes and yes. And some might say that crafting one out of cardboard is as useful as owning a vintage one—neither actually work so why not design your own?
I made this super-fun DIY cardboard typewriter for Camp.com. In order to make one, you kind of have to be a recyclable hoarder—a shoebox, a paper towel roll, a cereal box, and some jar lids.
1/ To create the sloped face of your typewriter, you have to cut the bottom half of the box on a slope. Measure 1 ½ to 2 inches from the bottom of the box and make a mark on the two front corners. Connect these points by drawing a line across the front and lines up the side diagonally to the top edge of the box’s bottom.
2/ Cut the box on these lines and cut off the rim of the box lid. Save the extra cardboard for Step 5.
3/ Fold the top of the box lid down and tape it on the three open sides (or four is your shoebox is not the hinged type.
4/ Cover the box in duct tape or a strong, colored masking tape. You may need to apply multiple layers to cover any logos.
5/ Cut 2 1 ½ -by-4-inch rectangles from the extra cardboard from Step 2. Cut two divots in the cardboard that fit the tube. (If your tube needs to be cut down, make sure it is about 1 inch wider than the box.)
6/ Cover them with tape, then tape them to the top sides of the box; trim the corner to follow the sloped line of the box.
7/ Paint cardboard tube black; let dry.
8/ Break skewer to match the width of the box. Bend your straws and trim the long ends to the length of the skewer; slip them over the skewer. Tape the short ends of the straws to the top corners of the shoebox typewriter.
9/ Glue the jar lids to the ends of the painted cardboard tube; let dry.
10/ Print out keyboard template and use a glue stick to attach to the inside of a cereal box. (Choose your punctuation marks and emojis!)
11/ Cut out the keys and adhere them to the typewriter box using cut mounting squares.
12/ Cut plastic lid (we used a tennis ball can lid) in half and glue one piece to the center of the typewriter along the top edge. (Save the other half for another project!)
Break Q-tips in half and dip the ends in black paint. Let them dry on wax paper. Glue them around the rim of the plastic lid from step 12.
Who knows? This may be the start of the next great American novel!
Instead of preserving nature by pressing or drying leaves, you can instead use them to make an imprint in one of my favorite craft supplies: air dry clay.
Go on a nature walk with the kids and find leaves that have very pronounced veins—the more distinct the veins, the better the finished product. Roll out the air dry clay until it’s about 1/4″ thick, then use a rolling pin to press the leaves down into the clay. Peal away the leaves and use a toothpick to “cut out” the leaf. Gently rest the clay leaf inside a bowl, creating a bend, and let them dry completely (at least 24 hours). I made a very watery acrylic paint mixture to add a translucent coating to the leaves, but you can choose whatever paint finish you like. The one thing to keep in mind: if you are using water with your paint, you have to paint your strokes fast and few…when air-dry clay gets wet, guess what it does? It wants to return to malleable clay, so you have 2, maybe 3 strokes to get it fully covered.
Check out the full post that I did for Camp.com for more details!
Now that winter is over and spring cleaning is upon us, you likely have some lone gloves who lost their mate in the last sledding excursion of 2021. You have three options here…first, you can hold onto that glove, hoping that one day the other will magically reappear. Second, you might be the “out of sight, out of mind” type and you just get rid of the sad lone glove. And third, if you are like me, you’ll keep it and turn it into a fun craft.
The how-to for this recent project can be found over on Camp.com! And for other ideas of past glove monsters, check out this post from a few years back!


