Art is in the eye of the beholder, but this artist is undeniably adorable! This quick and easy costume is a great last-minute choice for the kid who can’t make up her mind! You likely have many of the crafty items at home, and you can pair them with these perfect pieces from Primary.com to give your artist that extra je ne sais quoi! I love the french striped look alongside the more funky star pant, giving this little painter an edgy vibe.
When we were trying to think of Halloween costumes that could naturally sport a face-mask (because, let’s face it, if your kids are doing anything with other kids on Halloween, even trick-or-treating, face masks are a must!), the idea of a beekeeper came to mind. No, they don’t typically require the face mask, but you can double up with a face mask and face shield if you want to be extra safe (both from imaginary bees and bugs of the viral type).
We started with our clothing pieces from Primary…all you need is just two simple pieces that your kid will be comfortable in! And again, one of the best parts of this costume is that nothing is attached permanently, so they can wear the clothing IRL, post-Halloween.
And of course this beekeeper needs to show off the honey (CANDY!) that he’s collected, so you can make these easy honey-jar candy-carrier from an upcycled oatmeal container.
This is a great DIY Halloween costume to make with your young kids. They will love bringing pom-poms to live as buzzing bumblebees!
Glue the small black pom-pom to the end of the yellow pom-pom as the bee’s head.
Cut small teardrop shapes from the peach felt and glue onto the top/back of the bee as the wings.
Attach bees to clothing with glue dots.
MAKE THE HAT
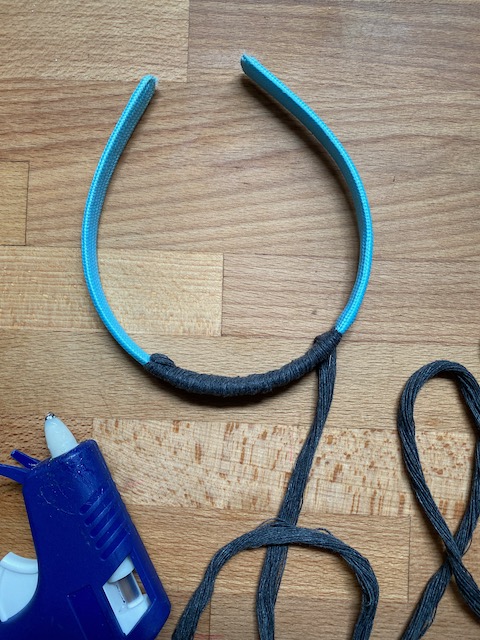
Paint the hat white (optional).
Hot glue a 6-inch wide piece of tulle all the way around the lip of the hat with the opening in the back.
Use glue dots or hot-glue to attach bees to hat.
MAKE THE HONEY CANDY CARRIER
Cut 3 long strands of yellow/orange rope or yarn and braid them together. Knot them at each end and hot-glue inside the oatmeal container.
Cut drips out of one color of cardstock and glue them to the top edge of the secondary color.
Now you need to add the word HONEY to the front. You can write it with a marker, use letter stickers, or cut out the word using your Cricut. Here’s my template here if you’d like to use it (ours was 6 inches wide).
In 2020, I’d say the newest verb to hit the lexicon is “to zoom.” Kids, executives, and college friends…we all zoom. All. The. Time. What was just an onomatopoeia word back in February, is now a non, a verb…a whole new way of living!
So when I embarked upon a 2020 Halloween Costume project with Primary, I knew that I needed to tackle Zoom as one of my costumes. And what is Zoom? It’s business up top, party on the bottom…am I right? Primary has so many amazing basics that feel so soft and cozy, you’d actually never know you were wearing a button-down.
Download our printable to make the color-yourself Zoom frames, and iron-on the “mute” symbol onto a Primary mask.
Create a 1/2″ border of black tape around the cardboard. Fold the tape over to cover the edges.
Print out the template 1 and template 2 (each template has a mix of different face styles); cut and color the frames to match your classmates. Write the names in the lower left-hand corner.
Glue the frames to the cardboard, leaving the center clear (for most, you’ll need about 18 colored frames.)
Measure the height and width of your child’s head and sketch their head-shape on a piece of cardstock. Cut it out. Trace this shape onto the top of the cardboard.
Carefully cut out the head shape from the cardboard with the x-acto knife.
Cut a piece of elastic that stretches over the back of the face opening, measuring it against the child’s head. Glue it to either side of the opening
To make the mask, print this template onto iron-on material or using red vinyl on your Cricut (we sized ours to 3″ tall). Iron the design to the mask following the instructions on the materials’ packaging.
This is such a fun DIY Halloween costume because your kids will really get into helping you with the coloring and naming the members of the Zoom! Thanks to Primary for the amazing clothes that made this happen!
If one good thing came out of this crazy 2020, it’s that the public-at-large recognized the true importance of the Essential Worker. This year, at Project Kid, we could have made 83 different essential worker costumes, from doctors to nurses to grocery store clerks to fire fighters.
But since healthcare has been the real focus of the year, we are honoring the people that work in the hospitals—the doctors, nurses, hospitalists, physician assistants—all of ’em with this essential workerHalloween costume.
We were excited to get to work with Primary again this year on our Halloween 2020 costumes! They have the best, most durable basics that fit and last until your child grows out of em. And with these costumes, your kiddo will get to wear, play, and quarantine in these clothes long after Halloween.
Nothing makes me happier than an upcycled craft…you know the stuff: toilet paper tubes, bottle caps, newspaper. But these days, I run out of supplies before I even use up the next product. Luckily you can buy cardboard tubes, called craft rolls, so you can make these Halloween characters for days! My friends at Oriental Trading supplied me with the goodies to make these spooky and sweet characters. Head over to Fun365 for the how-to’s!
The spiders above are made from a half craft roll and black pipe cleaners. Tie them with fishing line and hang them on your front door or over the mantle.
What I love about making monster crafts is that there are no rules! One eyeball? Two? Twenty-two? All is allowed! These eye stickers are a great buy for crafts galore.
These ladies give a new meaning to the word “witch craft!” The Oriental Trading felt pack will give you everything you need for these and more! (Even the broom and cauldron are made from toilet paper tubes!)
8 year-old-kids bring the best of both worlds…they are still cuddly little people, needy in all the delicious ways, but they can also get themselves dressed and can put their plates in the dishwasher (um, sometimes). Snuggles mixed with a dash of independence—what’s better than that? This age also welcomes the chapter book obsession, but luckily they still enjoy and benefit from the lessons of picture books. We have been Mo Willems fans from the start, and when Disney Book Group sent us the newest in his Unlimited Squirrels early-reader series, I Want to Sleep Under the Stars, we were immediately making up voices in order to give the book the dramatic reading it deserves (with stuffed animals, of course). And since stuffed animals are literally members of our family, Sommer wanted to craft a little tent and campfire under the stars…so we got to work!
The story is one of best intentions—Zoom Squirrel announces that he wants to sleep under the stars, and his squirrel buddies throw all of their encouragement behind him, but to a fault. Their cheers and chants actually prevent him from sleeping, under the stars or anywhere! It’s a simple story about listening to the needs of others and finding a way to bring joy and satisfaction to the people that you love.
As a family that loves to camp, we got so into making this little camping scene under the stars. You can size it to fit stuffies of any size, but this particular one fit our animals that are about 7 inches in length. A day of reading, crafting, and then playing…what could be better?
TENT:
Felt
Cardboard
Craft paper
Glue
Scissors
String
2 buttons
Cotton balls
Starting with a 12-by-10-inch piece of cardboard, with a fold breaking the 12-inch side into two 6-inch halves, draw a rectangle centered on a 10-inch side, about 6 inches wide by 5 inches tall. Cut this out.
Trace this cardboard onto a piece of scrapbook paper, and cut out.
Glue the craft paper to the cardboard, making sure that it easily folds to the inside.
Trace the cardboard onto a piece of felt, adding 4 to 5 inches to the length (making it 17 to 18 inches by 10 inches). Line the window edge up to one end of the felt, and this time don’t cut out the rectangle. Just cut slits up the sides of the rectangle, leaving the top line intact. Glue the felt to the other side of the cardboard.
Now add glue to the “feet” of the cut sides of the tent and glue them down onto the extra felt, giving the tent a bottom or floor.
Trace the side triangles of the tent twice onto felt and cut out. Glue these triangles to the sides of the tent.
Glue two pieces of string to the cardboard under the tent’s flap.
Glue buttons to the back top edge of the tent. When the glue dries, roll up the tent flap and wrap the strings around the buttons to keep them in place.
Make a pillow by cutting a long rectangle of felt, about 2-by-6 inches, placing cotton balls on one side, then folding the felt over and gluing to seal.
FIRE:
Sticks
Red, orange, and yellow felt
Glue
Break twigs and glue them together in a triangle. Cut flames from red, orange, and yellow felt. Make the red pieces the largest, and the yellow pieces the smallest. Stack and glue them together.
Glue the felt flames to the inside of the sticks. Add extra sticks around if needed.
STAR MOBILE:
Wire
Wire cutter
Spool
Star stickers
Fishing line
Scissors
Cut a 10-inch piece of wire and form it into a circle.
Cut a 12-inch piece of wire and twist it onto the circle.
Cut pieces of fishing line, and sandwich each end in between two silver star stickers. Tie the fishing line to the wire circle. Repeat until you have a star mobile.
Wrap the other end around the spool to make it hang above the tent.
Don’t forget to check out Unlimited Squirrels in I Want To Sleep Under the Stars! The series addresses a range of physical, emotional, and social development markers that helps spark conversation between parents and early-readers. You’ll find interesting and educational content in all of the Unlimited Squirrels books, packaged with quizzes, jokes, and entertaining stories from a hilarious cast of Squirrels! We love it!
Lumpy, bumpy, twisty mini-gourds are a strange bunch, but they so perfectly lend themselves to being converted into a wacky gaggle of Halloween critters, creatures, and bugs. Pipe cleaners, beads, and drinking straws are all you need to bring these weird-o pumpkins to life.
Head over to Parents Magazine to see the rest of the kooky Halloween pumpkin bunch!
How to Make It: Stick ball-head pins into pom-poms to make eyes. With screwdriver, poke small holes into gourds and insert chenille stems for legs (and/or wings). Slip beads over the ends of the legs to make feet. For a different look for the legs (as shown at far left), slip paper straws over the chenille stems.
There’s a chill in the air, and round orange fruits are popping up on street corners! It’s pumpkin-time! We may have no idea what Halloween is going to look like this year, but one thing is for sure…pumpkins are going to find their homes on front porches, stoops, and doorsteps, and if there’s any year to trick these guys out more than ever, it’s NOW!
This super-fun little weird-o is one that I made for the current issue of Parents magazine. We really wanted to play with whimsy this year, and this pumpkin creature has all of my heart.
There it is again…that buzzword, STEAM. Or STEM. In case you haven’t heard of this term, it stands for Science Technology Engineering Art and Math. It basically encompasses all the things that parents want their kids to excel in academically, minus the humanities (still waiting for that acronym).
I crafted these STEAM-inspired projects, invented by some of my fave STEAM experts out there, for Family Fun magazine. For the most part, you’ll likely have most of the materials, but for anything that you don’t have, I’ve included links below!
(Above) ThisBalance Sculpture by Babble Dabble Do is as beautiful as it is educational. Design yours with lots of colors or keep it monochromatic like this green one.
Generally, if I can use one upcycled material per craft, it’s a win. When I can nail down three upcycled materials, I feel like a magician! This upcycled lighthouse that doubles both as a nightlight and a bookend is one of the projects. All of the recycled materials are used relatively in tact, and they piece together beautifully to make this multi-purpose, satisfying craft.
If you have a kid that dreams of the ocean. loves boats, or has a thing for lighthouses of course, then this is your project.
What you’ll need:
One 10-ounce plastic bottle, empty and dry (mine was a Method Home hand-soap bottle, but you could also use a vegetable oil bottle)
To create the lighthouse’s gallery ledge, center the opening of the empty bottle on the tennis ball can lid and trace. Cut a slit into the plastic and cut out the circle. Set this aside.
Use the funnel to pour alternating layers of red and white sand into the bottle. (You can measure out even stripes or just eyeball it.) Fill all the way to the top and seal the opening with electrical tape.
Wrap electrical tape around the threaded part of the baby food jar, and color the bottom of the outside of the jar with the black permanent marker. Slip the gallery ledge around the mouth of the bottle.
To create the lighthouse’s lantern room, stand a tea light on top of the bottle and cover it with the baby food jar. (My jar lid sat perfectly atop the bottle and tea light, but if you find yours is less steady, use glue dots to keep it in place.)


 Cut
Cut


