

This post was sponsored by Primary.com.

When we were trying to think of Halloween costumes that could naturally sport a face-mask (because, let’s face it, if your kids are doing anything with other kids on Halloween, even trick-or-treating, face masks are a must!), the idea of a beekeeper came to mind. No, they don’t typically require the face mask, but you can double up with a face mask and face shield if you want to be extra safe (both from imaginary bees and bugs of the viral type).
We started with our clothing pieces from Primary…all you need is just two simple pieces that your kid will be comfortable in! And again, one of the best parts of this costume is that nothing is attached permanently, so they can wear the clothing IRL, post-Halloween.

And of course this beekeeper needs to show off the honey (CANDY!) that he’s collected, so you can make these easy honey-jar candy-carrier from an upcycled oatmeal container.
This is a great DIY Halloween costume to make with your young kids. They will love bringing pom-poms to live as buzzing bumblebees!
What you need:

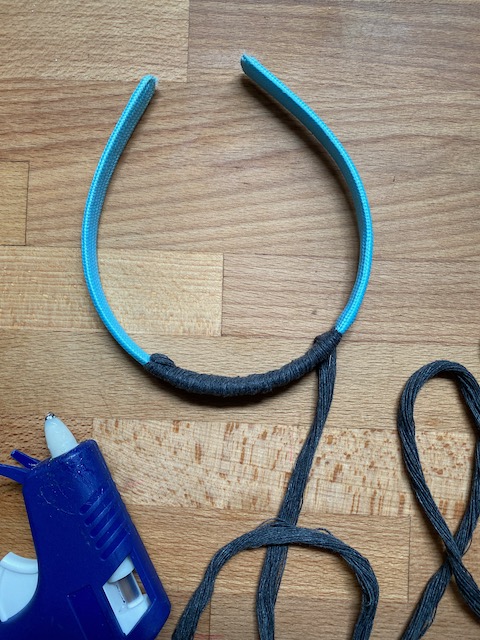
MAKE THE BEES


MAKE THE HAT


MAKE THE HONEY CANDY CARRIER
 Cut drips out of one color of cardstock and glue them to the top edge of the secondary color.


Thanks to Primary for sponsoring this post!

Thanks to Primary for sponsoring this post.

In 2020, I’d say the newest verb to hit the lexicon is “to zoom.” Kids, executives, and college friends…we all zoom. All. The. Time. What was just an onomatopoeia word back in February, is now a non, a verb…a whole new way of living!

So when I embarked upon a 2020 Halloween Costume project with Primary, I knew that I needed to tackle Zoom as one of my costumes. And what is Zoom? It’s business up top, party on the bottom…am I right? Primary has so many amazing basics that feel so soft and cozy, you’d actually never know you were wearing a button-down.
Download our printable to make the color-yourself Zoom frames, and iron-on the “mute” symbol onto a Primary mask.

What you need:

This is such a fun DIY Halloween costume because your kids will really get into helping you with the coloring and naming the members of the Zoom! Thanks to Primary for the amazing clothes that made this happen!


This post was sponsored by Primary.
If one good thing came out of this crazy 2020, it’s that the public-at-large recognized the true importance of the Essential Worker. This year, at Project Kid, we could have made 83 different essential worker costumes, from doctors to nurses to grocery store clerks to fire fighters.

But since healthcare has been the real focus of the year, we are honoring the people that work in the hospitals—the doctors, nurses, hospitalists, physician assistants—all of ’em with this essential workerHalloween costume.
We were excited to get to work with Primary again this year on our Halloween 2020 costumes! They have the best, most durable basics that fit and last until your child grows out of em. And with these costumes, your kiddo will get to wear, play, and quarantine in these clothes long after Halloween.

What you’ll need;
DIY STETHOSCOPE


FIRST AID TRICK-OR-TREAT BAG


Order your Primary pieces by October 21st to get them in time for Halloween!
October 9, 2020
Early Elementary, Everyday Crafts, Halloween, Holidays, Older Elementary, Preschool, Uncategorized


Nothing makes me happier than an upcycled craft…you know the stuff: toilet paper tubes, bottle caps, newspaper. But these days, I run out of supplies before I even use up the next product. Luckily you can buy cardboard tubes, called craft rolls, so you can make these Halloween characters for days! My friends at Oriental Trading supplied me with the goodies to make these spooky and sweet characters. Head over to Fun365 for the how-to’s!
The spiders above are made from a half craft roll and black pipe cleaners. Tie them with fishing line and hang them on your front door or over the mantle.
What I love about making monster crafts is that there are no rules! One eyeball? Two? Twenty-two? All is allowed! These eye stickers are a great buy for crafts galore.

These ladies give a new meaning to the word “witch craft!” The Oriental Trading felt pack will give you everything you need for these and more! (Even the broom and cauldron are made from toilet paper tubes!)

October 8, 2020
Activities, Age, Animals, Early Elementary, Everyday Crafts, Family Bonding, Nature, Preschool, Toys, Unplugged Time, Yarn & Fabric

This post is sponsored by Disney Book Group.

8 year-old-kids bring the best of both worlds…they are still cuddly little people, needy in all the delicious ways, but they can also get themselves dressed and can put their plates in the dishwasher (um, sometimes). Snuggles mixed with a dash of independence—what’s better than that? This age also welcomes the chapter book obsession, but luckily they still enjoy and benefit from the lessons of picture books. We have been Mo Willems fans from the start, and when Disney Book Group sent us the newest in his Unlimited Squirrels early-reader series, I Want to Sleep Under the Stars, we were immediately making up voices in order to give the book the dramatic reading it deserves (with stuffed animals, of course). And since stuffed animals are literally members of our family, Sommer wanted to craft a little tent and campfire under the stars…so we got to work!

The story is one of best intentions—Zoom Squirrel announces that he wants to sleep under the stars, and his squirrel buddies throw all of their encouragement behind him, but to a fault. Their cheers and chants actually prevent him from sleeping, under the stars or anywhere! It’s a simple story about listening to the needs of others and finding a way to bring joy and satisfaction to the people that you love.

As a family that loves to camp, we got so into making this little camping scene under the stars. You can size it to fit stuffies of any size, but this particular one fit our animals that are about 7 inches in length. A day of reading, crafting, and then playing…what could be better?
TENT:

FIRE:

STAR MOBILE:


Don’t forget to check out Unlimited Squirrels in I Want To Sleep Under the Stars! The series addresses a range of physical, emotional, and social development markers that helps spark conversation between parents and early-readers. You’ll find interesting and educational content in all of the Unlimited Squirrels books, packaged with quizzes, jokes, and entertaining stories from a hilarious cast of Squirrels! We love it!


