Need a super fun, super relaxing weekend project? Here ya go!
What you need:
Embroidery floss
Needle
White colored pencil
1. Mark your curve
Using your white colored pencil, make small marks where you want your rainbow to begin and end on your pocket. Then connect these two spots by drawing a curve. To perfect the curve of your rainbow, you can trace a frisbee, embroidery hoop or something else with a smooth curved edge.
2. Thread up
Thread your needle, knot your embroidery floss and stitch along the curve. Instead of the basic running stitch, you’re going to sew split stitches so your rainbow is a solid line. (Find the split stitch tutorial here.) Once you’ve completed your first row, stitch two more rows of the same color right alongside it for a nice, heavy line.
3. Keep stitchin’!
When you’ve finished your three rows, tie off the embroidery floss and snip off any excess. Repeat this process with all of your colors, until your pockets are bright and colorful!
When it comes to Halloween, I literally can find a way to leave no stone un-spooked. It happens just once a year, so I say, go all out and craft the heck out of it!
This cute slash spooky black-cat candy bowl was inspired by these kitty cat containers that I made earlier this year…just on a grander scale!
You can find the templates on the link above (just resize them to fit your box), and I’ve edited the how-to below!
When toys can teach our kids about interesting careers, I’m all for it! Barbie has come out with a line of dolls that focuses on getting kids interested in careers through pretend play. Gone are they days when Barbie is just into Ken!
This year they asked if I’d design costumes to match these dolls and this beekeeper might be my fave!
What you’ll need:
White zipper sweatshirt
Jeans
White gloves
Safari hat
White paint
White tulle
Black, white, yellow felt
1” Yellow pom-poms
½” black pom-poms
Scissors
Hot-glue gun
Paint hat white. Hot-glue white tulle to the edge, leaving about a 2” gap in the back.
Patch: Cut shapes from black, white, and yellow felt and hot glue together. Hot glue to sweatshirt.
Bees: Hot-glue black pom-pom to yellow pom-pom. Cut 2 thin strips of black felt and glue around the yellow pom-pom. Cut wing shape from white felt and glue to the back of the bee.
With a new shift in how Barbie is reaching girls, they are designing career dolls that have a very interesting range. When they asked me to make costumes to match this new line of dolls, I was very excited to see this construction builder as one of them. A job that most think is held primarily by men, girls are now learning that women are more than capable of this type of career path.
What you’ll need:
White t-shirt
Yellow t-shirt
Jeans
Orange duct tape
Orange paint
Paintbrush
Cardboard
Scissors
Thin black duct tape
Thin silver duct tape
Black marker
Pink construction helmet
Toolbelt:
Cut 7” tools from cardboard and paint them orange.
Adhere 2 strips of orange duct tape face to face to make the belt.
Cover a sheet of copy paper with orange tape and fold in half lengthwise. Cut up the middle to create to 5.5” by 4.25” rectangles. Tape up the two open sides to make pockets.
Fold over a strip of duct tape to make a 1” tall strip. Glue to the front of each pocket to make a loop to hang tools.
Hot glue pockets to the middle of the orange strip, insert the tools, and attach in the back with a piece of duct tape.
Vest:
Draw a line down the center of the shirt and two curved lines around the sleeves.
Adhere a piece of black tape down the center and silver tape on the side panels to match Barbie’s vest.
Cut up the center black tape line and cut off the neck of the t-shirt.
There was a time, and it wasn’t too long ago, that we only associated Barbie dolls with beauty, fashion, shopping, and let’s not forget Ken. Barbie has pivoted in a big way to teach little girls that they truly can be anything they want to be.
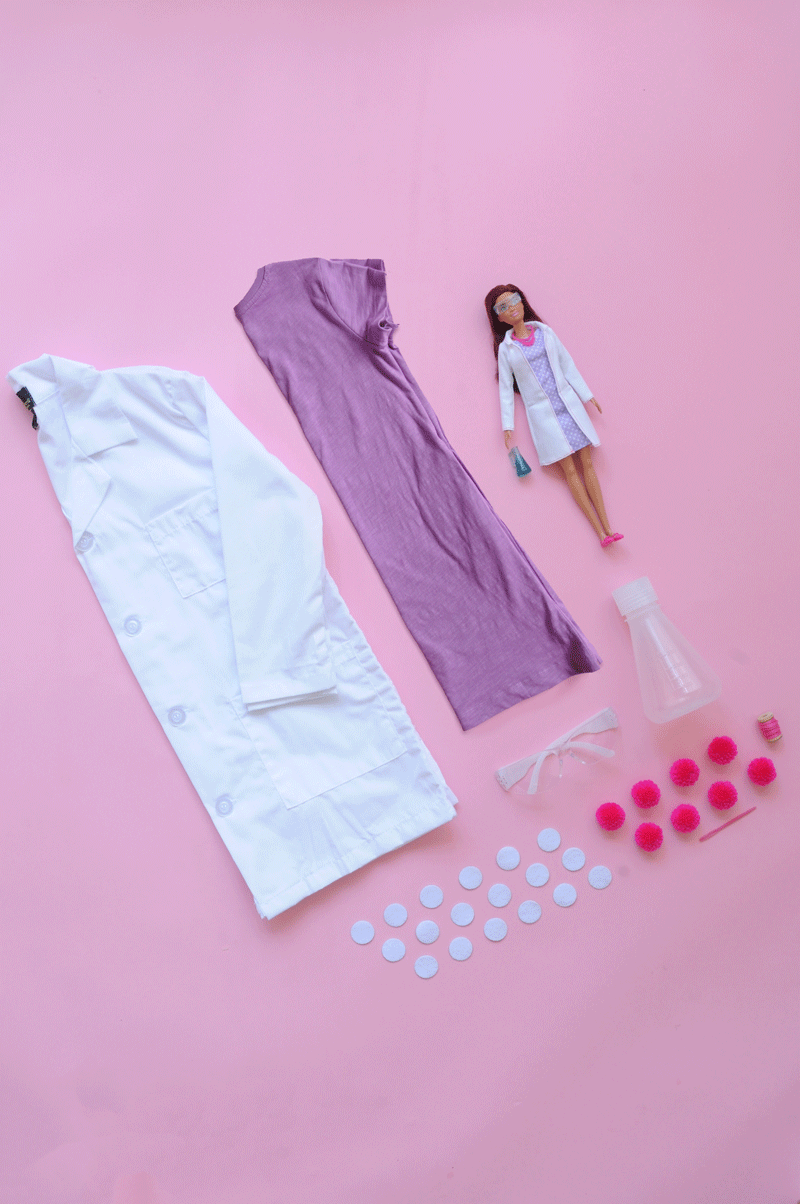
When my friends at Barbie asked me to create DIY costumes based on these new career dolls, I was excited to help promote this positive shift. Check out this intelligent and respectable scientist, with not just matching necklaces, but matching lab flasks, too!
What you need:
White costume lab coat
Lavender t-shirt dress
White felt dot stickers
Ruler
Pink pom-poms
Pink string
Needle
Scissors
Science goggles
Plastic lab flask
Adhere white felt circle stickers to dress. Use a ruler to line them up.
Thread pink pom-poms onto string to make Barbie’s necklace. Knot in back.
Fill plastic flask with water and add food coloring to match.
At some point in our lives, we all dream of being an astronaut…of floating around in the space and sticking a flag on the moon. Barbie is now turning those dreams into dolls in their new line of career dolls.
For Halloween, they asked me to design DIY costumes based on these awesome dolls. Super easy, this costume will thrill any girl to match her mini-me.
What you need:
White helmet
White pullover sweatshirt
White sweatpants
White neck gaiter
White gloves
Blue tape
Silver tape
Red, blue, gray, white, green felt
Blue rhinestones
Scissors
Hot-glue gun
2” white dot stickers
Apply blue and silver tape to the legs, following the pattern on Barbie’s suit.
Cut off bottom cuffs of sweatpants.
Cut out dials and patches from felt to match Barbie’s suit and apply with hot-glue. Glue on blue rhinestones to add details.
Cover holes in the bike helmet with 2” white dot stickers.
Halloween is a holiday with multiple personalities—It can be silly, gory, spooky, sexy, or—especially this year—mystical and elegant. That’s the aesthetic that inspired this DIY, which taps into the current divination-centric decor trend.
Step 1: Scoop alginate compound into a large bucket or bowl. To cast an adult hand, you’ll need 6 cups.
Step 2: Add an equal amount of room temperature water to the alginate powder.
Step 3: Stir the ingredients together with a wood stick. Then eliminate any remaining lumps with one hand, making sure to keep the other hand clean for casting.
Step 4: Quickly pour the paste into the 2-liter bottle.
Step 5: Insert a clean hand, held in the pose that you want to cast, into the mixture. Keep your hand submerged and in position, remaining as still as possible, for 3 to 5 minutes.
Step 6: Tap the top of the alginate with your free hand to make sure it’s fully set. Once the alginate has hardened, gently wiggle your submerged hand and fingers to get them loose. Carefully remove your hand. Congratulations—you’ve just made a mold!
Step 7: Set your mold to the side and mix up some plaster according to package instructions, stirring thoroughly until smooth.
Step 8: Pour the plaster into the mold you created. Depending on the humidity, it can take 30 minutes or longer for the plaster to set.
Step 9: Once the plaster has set, tap the top to loosen, then begin cutting away the plastic bottle using a craft or utility knife. Continue cutting carefully, now through the alginate, being mindful not to cut into the plaster fingers you’ve made. Keep removing alginate until your plaster hand is revealed. If there are any air bubbles or mistakes, use extra plaster to fill in the holes.
Step 10: Let the hand dry for at least 12 hours before painting, and sand off any rough spots before you begin. You can also sand the bottom of the hand into a flat base so that it can stand upright.
Step 11: Paint the plaster with an opaque acrylic paint and let dry.
Step 12: Using a fine-tip paint pen in a contrasting color, follow a palmistry diagram to draw markings on the painted hand.
Step 13: If you want to make a flat plaster hand into a candle holder, use a small chisel or a flat clay sculpting tool to carve out a hole in the plaster to fit the candle. Work slowly, carving just a little at a time, until you’ve made a shallow well that matches the candle’s diameter.
After many failed attempts at making cake pops (how are there so many bad instructions out there?), I finally watched Kris Galicia Brown’s Cake Pop Decorating Class on Bluprint. It was not only super informative, but it had debunked so many false “rules” of cake pops that I had been using…the biggest being that candy melts should only be melted in silicone or plastic (that’s the true statement).
When Bluprint asked me to make these Jack-O-Lantern cake poppers for an article on their site, I used all of her genius tips!
This shop has been compensated by Collective Bias, Inc. and its advertiser. All opinions are mine alone. #BackToSchoolGoals18 #CollectiveBias
All summer long I worry about brain drain. I mean, it doesn’t keep me up at night or anything, but I think a lot about how their every-day habits of learning 9 months of the year halt during the summer months.
Our school sends us homework packets to do over the summer (not to turn in, but just as practice—which is really what homework is, after all), but it’s always just math and literacy. One of my favorite things about my kids’ school is that they start them on Spanish in Kindergarten. Oliver and Sommer have come away from these classes with the cutest little accents! Because they learn in a totally immersive way from teachers whose first language is Spanish (they don’t think their teachers even speak English!), they have adopted the best pronunciation when speaking.
So this summer I decided to do a little exercise in keeping the language recognition going by making labels for common household objects. So when we refer to these objects, my husband and I say them in Spanish and that reminds the kids to do the same. Since we are spending the last part of our summer in Scandinavia, I made the labels double-sided to introduce them to a little Swedish. I wanted to make them “flippable” so I used this amazing product from 3M— Scotch® Wall-Safe Tape—from Walmart so I could (A) attach a string securely to the wall and (B) not damage the paint in the process!
Thanks to Brotherfor sponsoring this post and providing crafters with a cool tool for our trade!
I grew up with a mom that really knew how to do birthday parties. She could carry a theme from the invite (back when we sent paper invitations), to the activity, to the cake, to the favor. And this was well before Martha Stewart and Pinterest came along.
So regardless of my crafty career, there is no doubt that my kids’ parties would always be cohesive since that is what I knew to be normal. When I asked my almost six-year-old daughter, Sommer, what she wanted to do for her birthday, she said she wanted an animal party. But not one single animal…she didn’t want to hurt any species’ feelings by being left out. (Can you even stand it?)
When my friends at Brother asked me to design a party using their P-touch Embellish Ribbon & Tape Printer, I was giddy with the endless possibilities. I laid all of my ribbons and tapes in front of me and realized that I literally had the entire rainbow at my fingertips, so I dove in and used the full spectrum, creating an animal party full of whimsy and joy with animal faces that all kids will fall in love with!
Here’s how we celebrated and what we made…
PAPER PAW-TY HATS
To carry the animal theme, we used the adorable paw print symbol to make ribbon tassels for the tops of basic party hats. Here is a free printable that you can use to print out these cute, animal hat medallions.
ANIMAL TRIVIA GAME
This is the third time I’ve made a punch game for my kids’ birthday parties. They love the action of punching and the surprise of what’s inside!
What you’ll need:
Clear cups
Tissue paper
Hot glue gun
Craft glue
Pencil
Sponge brush
Small toys
Foam core
P-touch Embellish Ribbon & Tape Printer
P-touch TZe ribbons and patterned tapes
Craft sticks (we used the big wavy type!)
Make it:
Count out the number of cups you need and arrange them on your board in an interesting shape.
Wrap small toys in colored tissue and put them in the cups.
Trace cup onto the tissue paper and cut out as many circles (just outside of your pencil line) as you have cups, matching the color of the circles to the paper inside.
Print the answers to your trivia questions on TZe tape and adhere one to each circle.
Use the sponge brush to apply a thin layer of glue on the edge of the cup and gently pat the tissue circle on the edges.
Hot glue the bottoms of the cup to the board.
Print the trivia questions on TZe tape and adhere them to wooden craft sticks.
To play, each guest picks a stick, reads the questions, and has to find the answer. They use the stick to punch through the tissue paper to get their prize!
Print out a message on each bag. We customized ours for each guest. They read “Thanks for coming to my party, Evie! Love, Sommer” (That extra special touch is what makes this tool so unique!)
Hot-glue the ends of the ribbon to either side of the opening of the bag.
Cut out the iron-on animal heads and iron to the bags, according to the product’s package instructions.
Stuff with small toys and treats. (We even labeled pencils with the P-touch TZe tape with goofy messages like “Write on, Oliver!”)
If you want to decorate with the adorable animal-face garland that we made, you can print out these, cut out the circles, and string them onto a thin string. Just punch two holes at the top of each circle to thread the string through.
Thanks to Brother for sponsoring this post and providing crafters with a new tool for our trade!
Illustrations and animal paintings by Clare Yaghjian